视频是yuv格式,这里讲一下yuv的格式读取。用二进制读取yuv文件,从开头开始前wh个字符的ascii码则是第一帧的灰度图(8位int),后面第w//2h//2*2个字符存的是rgb信息。然后开始是第二帧。
这里基本思路就是每次更新背景,然后做差分,然后优化噪声。
直接上代码
import cv2
import os
import numpy as np

class AnimTest():
    def __init__(self):
        self.bg = None    #存背景,用int16
        self.n = 0        #用于计数第几张图

    def resolution(self, w, h):
        self.w = w
        self.h = h
        self.im = np.zeros((h,w))   #差分去噪处理后的返回矩阵

    def cell_split(self, row, col):
        self.r = self.h // row     #每格高
        self.c = self.w // col     #每格宽

        # draw
        '''
        for i in range(self.r-1, self.h-1, self.r):
            self.im[i] = 0
        for j in range(self.c-1, self.w-1, self.c):
            tmp = self.im.T
            tmp[j] = 0
        self.im = tmp.T
        '''

    def dir_region(self, x, y, x1, y1):
        #计算真实的左上,右下坐标
        self.x = self.c * x
        self.y = self.r * y
        self.x1 = self.c * x1 - 1
        self.y1 = self.r * y1 - 1
        #print(self.x,self.y,self.x1,self.y1)

        #draw
        '''
        for i in range(self.c * x,self.c * x1):
            self.im[self.y][i] = 255
            self.im[self.y1][i] = 255
        for i in range(self.r * y,self.r * y1):
            self.im[i][self.x] = 255
            self.im[i][self.x1] = 255
        '''

    def set_threshold(self, t, s):
        self.t = t
        self.s = s

    def yuv_process(self,im):
        if self.bg is None:
            self.bg = im.astype(np.int16)
        #self.im = np.abs(self.bg-im)
        '''
        for i in range(self.x,self.x1):
            for j in range(self.y,self.y1):
                if im[i][j]>self.bg[i][j]:
                    self.im[i][j] = im[i][j]-self.bg[i][j]
                else:
                    self.im[i][j] = self.bg[i][j]-im[i][j]
                if self.im[i][j] < 20:
                    self.im[i][j] = 0
        '''
        #self.im = self.fgbg.apply(im)
        #背景数据得新背景
        self.n += 1
        tmpbg = (self.bg / self.n).astype(np.uint8)  #背景除次数,转为uint8格式

        #优化图像与背景差分后的图像
        self.im = cv2.absdiff(im,tmpbg)            #做差
        self.im[np.where(self.im<50)] = 0          #二值
        self.im[np.where(self.im>=50)] = 255
        #mean = self.im.mean()
        #var = self.im.std()
        #print(mean,var)
        #self.im[np.where(np.abs(self.im - mean) - 2.0 * var > 0)] = 255
        #self.im[np.where(self.im != 255)] = 0

        #背景迭代更新储存背景数据
        #im[np.where(self.im==255)] = 0
        self.bg = self.bg + im                    #背景叠加
        #print(self.bg[0][0])
        #print(im.dtype)


        #kernel = cv2.getStructuringElement(cv2.MORPH_RECT,(2,2))      #膨胀或腐蚀大小
        #self.im = cv2.erode(self.im,kernel)        #膨胀
        #kernel = cv2.getStructuringElement(cv2.MORPH_RECT,(10,10))
        #self.im = cv2.dilate(self.im,kernel)       #腐蚀
        #self.im = cv2.morphologyEx(self.im, cv2.MORPH_OPEN, kernel)    #开运算
        #这里没返回,直接到展示show()

    def show(self,i):
        res=cv2.resize(self.im,(192*5,108*5),interpolation = cv2.INTER_CUBIC)
        cv2.imshow('image', res)
        cv2.waitKey(20)
        #print(i)
        #cv2.imwrite("tmp/"+str(i)+".jpg",self.im)


def readYuvFile1(fp,width,height):
    uv_width=width//2
    uv_height=height//2

    Y=np.zeros((height,width),np.uint8,'C')

    for m in range(height):
        for n in range(width):
            Y[m,n]=ord(fp.read(1))

    fp.read(uv_height*uv_width*2)

    return Y


if __name__ == "__main__":
    #fgbg = cv2.bgsegm.createBackgroundSubtractorMOG()       #opencv 封装的一些背景减除方法MOG,MOG2等
    #下载图
    '''
    width = 1920
    height = 1080
    fp = open("雨+夜+马路1_1920x1080.yuv",'rb+')

    for i in range(100):
        print(i)
        data = readYuvFile(fp,width,height)
        Y=data[0]
        cv2.imwrite("image/"+str(i)+".jpg",Y)
    '''

    #初始化
    t = AnimTest()
    width = 1920
    height = 1080
    t.resolution(width,height)
    t.cell_split(108,192)
    t.dir_region(0,0,108,192)
    t.set_threshold(10,50)

    #处理展示,这里直接用的下载好的图
    for i in range(100):
        #im = readYuvFile1(fp,width,height)
        im = cv2.imread("image/"+str(i)+".jpg",0)
        t.yuv_process(im)
        t.show(i)
效果如下:
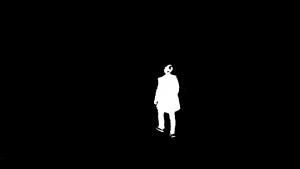
对于室内人物移动效果还是可以的,但对于不位移或有遮挡干扰等效果还是不行。
版权声明:本文为原创文章,转载请注明出处和作者,不得用于商业用途,请遵守
CC BY-NC-SA 4.0协议。
赏
 支付宝打赏
支付宝打赏
 微信打赏
微信打赏
支付宝打赏
微信打赏
赞赏一下